Materials Needed:
- Absorbent mat or towel
- Waterproof sheet or tray
- Water
Steps:
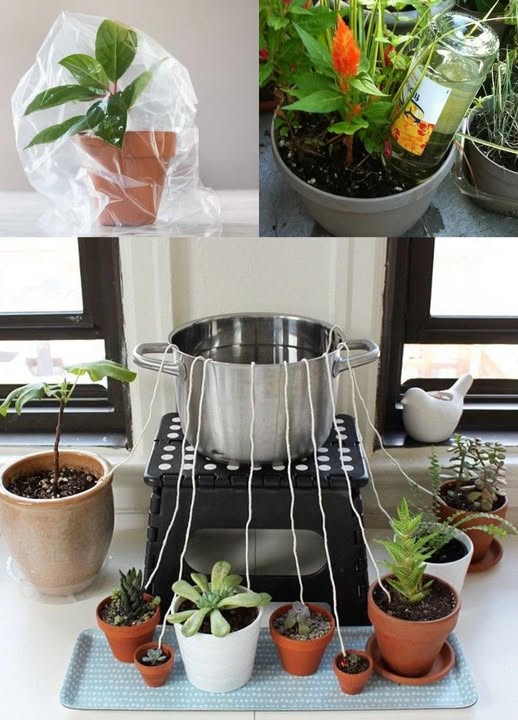
- Set Up the Tray: Place the waterproof sheet or tray on a flat surface.
- Lay the Mat: Position the absorbent mat or towel on top of the sheet or tray.
- Saturate the Mat: Thoroughly wet the mat, ensuring it is evenly moist but not waterlogged.
- Arrange the Plants: Place your potted plants on the mat, ensuring their drainage holes are in contact with the moist surface.
The mat will supply water to the plants through capillary action, keeping the soil consistently moist.
5. Grouping Plants Together
Creating a microenvironment by clustering plants can help retain humidity and reduce water loss.
Steps:
- Select a Location: Choose a shaded area away from direct sunlight to minimize evaporation.
- Cluster the Plants: Place the plants close together, allowing them to share humidity.
- Add Humidity: Optionally, place a shallow tray of water among the plants to increase ambient moisture.
This method helps maintain a humid microclimate, reducing the plants’ water requirements during your absence.
6. Utilizing Self-Watering Stakes
Commercially available self-watering stakes can provide a controlled water supply to your plants.
Materials Needed:
- Self-watering stakes (e.g., ceramic spikes)
- Water bottles
Steps:
- Prepare the Stakes: Soak the ceramic stakes in water to prime them.
- Attach Water Bottles: Fill water bottles and attach them to the stakes according to the manufacturer’s instructions.
- Insert into Soil: Place the stakes into the plant’s soil near the roots, ensuring they are securely in place. The stakes will release water slowly, keeping the soil consistently moist.
7. Plastic Bottle Irrigation System
A simple plastic bottle can be repurposed into an efficient irrigation system for your plants.
Materials Needed:
Plastic bottles (e.g., water or soda bottles)
A sharp needle or nail
Water
Steps:
Prepare the Bottle: Use a needle or nail to poke several small holes around the neck or near the bottom of the bottle.
Fill with Water: Fill the bottle with water and tightly screw on the cap.
Insert into Soil: Bury the bottle upside-down in the plant’s pot, ensuring the neck is securely embedded in the soil.
Water will slowly drip out through the holes, keeping the soil moist for several days.
8. Sponge Layer in the Soil
Adding a layer of sponge to the bottom of the pot can help retain moisture for longer periods.
Materials Needed:
Clean sponges
Potting soil
Water
Steps:
Prepare the Pot: Remove the plant from its pot and set it aside.
Add Sponges: Place a layer of clean, damp sponges at the bottom of the pot.
Replant: Refill the pot with soil and replant your indoor greenery.
The sponges will act as a water reservoir, slowly releasing moisture into the soil as needed.Bonus Tips for Vacation Plant Care
Reduce Water Needs: Before leaving, prune your plants by removing dead or unnecessary leaves. This reduces the water demand while you’re away.
Hydrate Thoroughly: Water your plants deeply before applying any of the methods above. Proper hydration beforehand ensures they start with adequate moisture levels.
Adjust Lighting: Move your plants away from direct sunlight to reduce evaporation and water loss. Place them in a well-lit, but shaded, area instead.Choosing the Best Method for Your Plants
The best hydration method depends on the type of plants you have and how long you’ll be away. For shorter trips, simple solutions like grouping plants together or using a sponge layer may suffice. For extended vacations, consider more advanced systems like self-watering stakes or drip irrigation setups.Enjoy Your Trip, Worry-Free
Leaving your indoor plants while on vacation doesn’t have to be stressful. By implementing one or more of these strategies, you can ensure your plants remain healthy and hydrated in your absence. When you return, you’ll find your greenery thriving, ready to greet you with vibrant leaves and blossoms.