ADVERTISEMENT
Creating the Mold Annihilator Paste
Begin by crafting a powerful, mold-fighting paste. This concoction will be the cornerstone of your cleaning effort, designed to cling to and penetrate the moldy caulk. In your disposable cup, mix about 1/2 cup of household bleach with a cup of baking soda. The goal is to achieve a consistency akin to toothpaste; this ensures the mixture will steadfastly adhere to vertical surfaces without sliding off. Adjust the proportions as necessary, depending on the thickness of the bleach and the baking soda’s granularity. The perfect paste will be your best ally in the battle against mold.
Application: The First Strike
Equipped with your toothbrush, apply the paste liberally to the affected caulk. A preliminary spot test on a small, inconspicuous area can safeguard against any unexpected reactions with your tile or caulk. Once you’ve confirmed compatibility, proceed to cover the moldy areas thoroughly with the mixture. Aim for a thick layer to ensure maximum penetration and effectiveness.
Let the concoction work its magic for about 30 minutes. Given the potent nature of bleach, ventilating the area by opening a window or using an exhaust fan is advisable to mitigate the strong odor.
The Waiting Game and Reapplication
After the initial 30 minutes, check the caulk. If areas have thinned or dried out, reapply the paste to maintain a consistent, effective coating. Set your timer for another 30-minute session, allowing the paste to continue its mold-fighting action.
The Final Assault and Cleanup
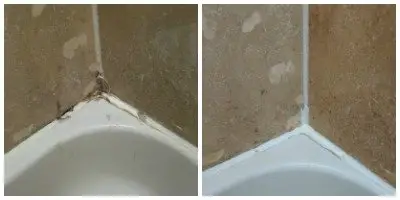
Once the hour is up, it’s time for the final push. Using the toothbrush, gently scrub the caulk to dislodge the now-weakened mold. This light abrasion helps ensure that the bleach has fully penetrated and eradicated the unsightly fungi. Rinse thoroughly with warm water, ensuring all traces of the bleach mixture are washed away, leaving your caulk clean and mold-free.
Conclusion: Victory Over Mold
With this simple yet effective method, the battle against mold in your shower caulk can be won. Not only does this approach save you the time and expense of replacing the caulk, but it also restores the cleanliness and aesthetic appeal of your bathroom with minimal effort. Regular maintenance using this technique can prevent mold from gaining a foothold in the future, ensuring your shower remains a clean, inviting space. Embrace this easy, do-it-yourself solution and enjoy the lasting benefits of a mold-free bathroom.
ADVERTISEMENT
