ADVERTISEMENT
The Soaking Strategy: The Gentle Giant of Grime Removal
For most grates and burner caps, especially those made of cast iron or enameled steel, soaking is your best friend. This method allows the cleaning agents to penetrate and break down the hardened grease and carbon without excessive scrubbing, which can damage the finish. Here’s how to do it effectively:
- Remove All Components: Carefully lift off all grates and burner caps. Place them in a large sink or a sturdy bucket. If your grates are cast iron, note that they are heavy and can scratch sink surfaces, so place a towel at the bottom of your sink or bucket first.
ADVERTISEMENT
- Hot Water and Dish Soap Bath: Fill the sink/bucket with very hot water – as hot as your tap allows. Add a generous squirt of your preferred grease-cutting dish soap. The hotter the water, the better it penetrates and loosens the grime. Swish it around to create suds.
- Add Degreaser (Optional but Recommended): For really tough buildup, add a few splashes of a dedicated kitchen degreaser to the hot, soapy water. This will supercharge the cleaning process. Ensure the degreaser is safe for the material of your grates.
- Let Them Soak: This is where patience comes in. Allow the components to soak for at least 30 minutes, or even a few hours for extremely stubborn grime. Overnight soaking is ideal if the grime is truly baked on. The longer they soak, the less scrubbing you’ll have to do. You’ll literally see the water change color as the grease begins to lift.
While they soak, you might be tempted to move on to other parts of the stove, but resist! This soak time is critical. It’s the silent workhorse of your deep clean, transforming rock-hard deposits into easily removable sludge. But what if soaking isn’t quite enough, or you have particularly stubborn, impossible-looking stains?
Alternative Methods: When Soaking Needs a Boost
Sometimes, even a long soak isn’t enough for those truly tenacious spots. Here are a couple of booster methods:
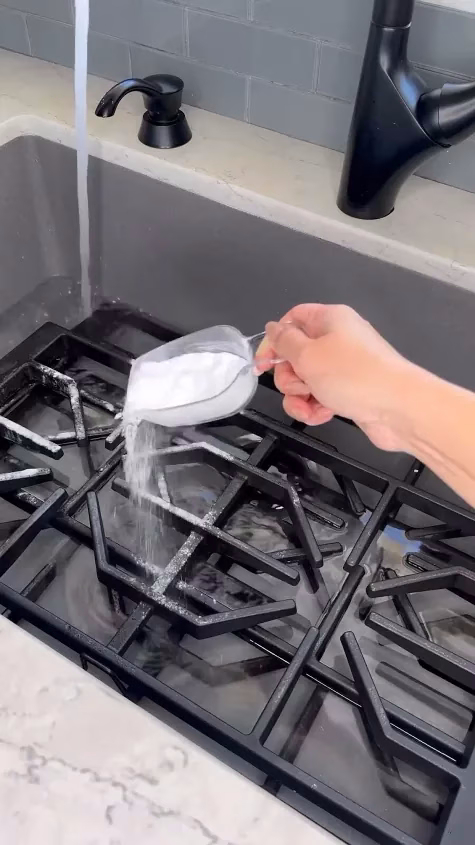
- Baking Soda Paste Power: For areas that refuse to come clean after soaking, create a thick paste using baking soda and a little water. Apply this paste generously to the stubborn spots on your grates and burner caps. Let it sit for another 15-30 minutes. The baking soda acts as a mild abrasive and helps to further break down grease. You can also sprinkle baking soda on a wet sponge and use it directly.
- The Ammonia Bag Trick (Extreme Caution!): This method is incredibly effective but requires extreme caution and *excellent ventilation*. Place your grates and burner caps (individually) into heavy-duty sealed plastic bags (e.g., Ziploc freezer bags). Add about 1/4 to 1/2 cup of pure ammonia to each bag. Seal tightly, ensuring no leaks. Leave the bags outside or in a very well-ventilated garage overnight (at least 8 hours). The ammonia fumes (not liquid contact) will break down the grime. DO NOT MIX AMMONIA WITH ANY OTHER CLEANER, ESPECIALLY BLEACH, AS IT CREATES TOXIC GASES. When ready, open the bags outdoors, quickly remove the items, rinse them thoroughly with a hose, and then wash normally with dish soap. The fumes are potent, so work quickly and in the open air.
These methods are for the most challenging grime, turning what seemed impossible into manageable tasks. But once the soaking and pre-treatment are done, the real scrubbing begins.
Scrubbing Techniques: Reclaiming the Shine
With the grime softened, it’s time for the final push. Choose your scrubbing tool wisely based on the material:
- For Enameled Grates/Caps: Use a non-abrasive sponge or a stiff nylon brush. Avoid steel wool or harsh scrub pads, as they can scratch the enamel, making it more prone to future staining.
- For Cast Iron Grates/Caps: Cast iron is more durable. You can use a stiff nylon brush, a scrubbing pad, or even a specialized cast iron brush. For very tough spots, a bit of steel wool might be used sparingly, but rinse immediately to prevent rust.
Scrub vigorously but methodically. Pay attention to all the nooks, crannies, and inner edges of the burner caps. You’ll be amazed at how easily the softened grime comes off. For detailed work, an old toothbrush is invaluable for reaching into those tiny spaces that larger brushes miss. Once satisfied that all the grime has been removed, a crucial final step remains.
Rinsing and Drying: The Final Polish
Thorough rinsing is essential to remove all traces of cleaning agents and loosened grime. Use hot, running water until the grates and caps feel completely clean and free of suds. Then, and this is critical, dry them *completely*. For cast iron, this is particularly important to prevent rust. You can towel dry them, or even place them in a warm oven (turned off, but still retaining residual heat from recent use) for a few minutes to ensure they are bone dry.
Once dried, you can even apply a very thin layer of cooking oil to cast iron grates to season them and add a layer of rust protection. Just wipe off any excess. Seeing your grates and burner caps transform from grimy burdens to gleaming components is incredibly satisfying, and it sets the stage for the next critical phase: addressing the delicate heart of your stove, the burner heads and spark igniters. Many homeowners overlook these, but doing so risks both efficiency and safety. Are you ready to dive into the intricate mechanics that power your flames?
SEE NEXT PAGE
ADVERTISEMENT
