ADVERTISEMENT
Step 3: Reclaiming the Realm – The Cooktop Surface Renaissance
With the grates, burner caps, and even the delicate burner heads restored to their former glory, your attention now turns to the expansive landscape of the cooktop surface. This is the visual centerpiece of your stove, the flat stage upon which all your culinary dramas unfold. While it might seem straightforward – a quick wipe and you’re done – achieving a truly pristine, streak-free surface requires more than just a passing glance. Different materials demand different approaches, and those persistent, baked-on stains require a targeted attack. This is where your deep clean truly begins to shine, transforming your stove from merely functional to strikingly beautiful.
The diversity of cooktop materials, from classic enamel to sleek stainless steel and modern glass, each presents its own set of challenges and demands specific care. A one-size-fits-all approach here will lead to scratches, dullness, or lingering streaks that detract from your hard work. But fear not, for within this section, you’ll discover the tailored techniques and insider tips that will bring out the natural luster of your cooktop, leaving it looking as if it just rolled off the showroom floor. Prepare to witness the satisfying removal of every last smudge and splatter, turning the mundane task of wiping into an art form.
The Diverse World of Cooktop Materials and Their Nuances
Before you begin, identify your cooktop material. This dictates your cleaning strategy:
- Enamel Cooktops (Porcelain Enamel): Common on older stoves and some newer, more traditional models. These are durable but can chip or scratch if treated too harshly. They are generally resistant to most common cleaners but can be dulled by abrasive scourers.
- Stainless Steel Cooktops: Popular for their sleek, modern look. They are durable but prone to smudges, fingerprints, and can scratch easily if abrasive materials or scrubbers are used. Streaking can also be a challenge if not dried properly.
- Ceramic/Glass Cooktops (though less common on gas stoves): While more prevalent on electric stoves, some gas ranges feature glass tops around the burners. These are highly susceptible to scratches from abrasive cleaners and require very gentle care to avoid dulling or permanent marks.
Understanding your material is the first step towards a successful, damage-free clean. Now, let’s talk about the specific types of stains you’ll encounter and how to tackle them effectively.
Targeting Different Types of Stains: A Customized Attack
Stains on your cooktop aren’t all created equal. Some are fresh, some are ancient, and each requires a slightly different approach:
1. Fresh Spills and Light Grease:
- For recent, non-baked-on spills, a simple wipe with a damp microfiber cloth and a drop of dish soap is usually sufficient. Wipe immediately after the stove has cooled to prevent them from becoming baked on.
- Follow with a rinse and then dry with a clean, dry cloth to prevent streaks.
2. Baked-On Grease and Food Particles:
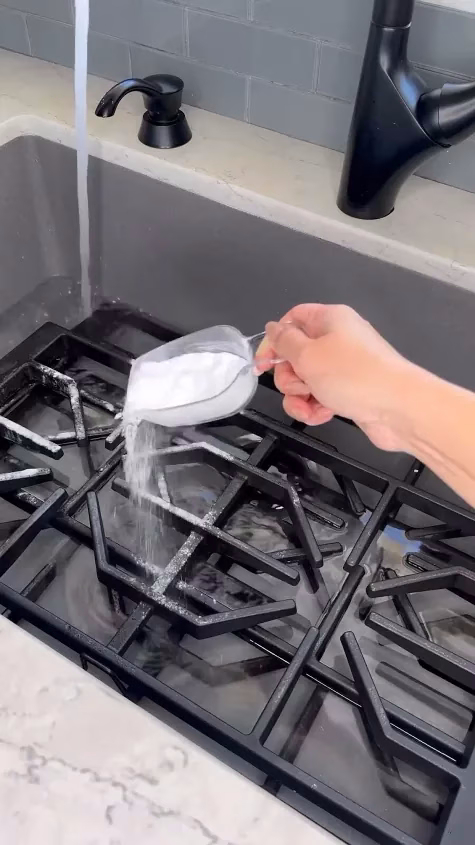
- This is the most common and challenging type of grime. Your best friends here are baking soda and a little patience.
- Baking Soda Paste Method: Sprinkle a generous amount of baking soda over the affected areas. Then, slowly add just enough water to create a thick paste. Spread this paste over the baked-on grime, ensuring it’s completely covered. Let it sit for at least 15-30 minutes, or even a few hours for really tough spots. The baking soda will work to loosen the bonds of the baked-on food and grease.
- Scrubbing: After the dwell time, use a non-abrasive sponge or a damp microfiber cloth to gently scrub the paste and grime away. You’ll find that what once seemed impossible to remove now comes off with relative ease.
3. Water Spots and Mineral Deposits:
- These often appear as dull, cloudy patches, especially around burner areas where water might have boiled over and evaporated. White vinegar is your secret weapon here.
- Vinegar Spray: Mix equal parts white vinegar and water in a spray bottle. Spray directly onto the water spots and mineral deposits. Let it sit for 5-10 minutes. The acidity of the vinegar will dissolve the mineral buildup.
- Wipe and Polish: Wipe away with a clean microfiber cloth. For persistent spots, a gentle scrub with a baking soda paste immediately after the vinegar treatment can be effective. Finish by wiping with a clean, dry cloth for a streak-free shine.
The Scraping Dilemma: When and How to Use a Razor Blade Safely
For truly carbonized, crusty deposits that refuse to budge with baking soda, a razor blade scraper can be a lifesaver, but it must be used with extreme caution. This method is generally more suited for glass cooktops, but can be carefully used on extremely durable enamel surfaces. Avoid on stainless steel unless explicitly stated by the manufacturer, as it can scratch easily.
- Angle is Everything: Hold the razor blade at a very low angle (almost flat, about 10-20 degrees) against the cooktop surface. Do NOT hold it perpendicularly, as this will gouge the surface.
- Push, Don’t Drag: Gently push the blade forward, allowing it to glide under the hardened grime and lift it off. Work in one direction, not back and forth.
- Moisture Helps: It’s often easier and safer to use the scraper on a slightly damp surface or after applying a cleaning paste (like baking soda) to provide some lubrication.
- Test First: If you’re unsure, test on an inconspicuous area first to ensure it doesn’t scratch your specific cooktop material.
This technique, when mastered, can remove what seemed like permanent fixtures on your cooktop. But once the tough stuff is gone, what’s left is to bring out that beautiful, reflective finish.
Polishing for That Showroom Shine
The final touch is polishing, especially for stainless steel and enamel cooktops, to remove any lingering streaks and add a protective gleam.
- For Stainless Steel: After cleaning, wipe down the surface with a dedicated stainless steel cleaner and polish, following the grain of the steel. Alternatively, a small amount of olive oil on a microfiber cloth can also bring out a beautiful shine and repel fingerprints. Always wipe with the grain.
- For Enamel: Once clean and dry, you can use a general kitchen cleaner or a simple vinegar and water solution to wipe down the surface. Then, buff with a clean, dry microfiber cloth until it gleams.
- For Glass/Ceramic: A glass cleaner or a specialized ceramic cooktop cleaner will give you a streak-free, polished finish. Buff with a lint-free cloth.
With your cooktop now gleaming, the transformation is almost complete. You’ve tackled the grates, the intricate burner components, and the main surface. But don’t pack up your cleaning supplies just yet! There are often overlooked areas that, once cleaned, contribute significantly to the overall sparkle and hygiene of your stove. Think about those humble knobs and the often-forgotten drip pans. You’re so close to a completely revitalized kitchen, but the devil is often in the details. What small, final steps will truly elevate your deep clean to perfection?
Step 4: The Finishing Touches – Knobs, Drip Pans, and Beyond
You’ve navigated the major cleaning challenges: the formidable grates, the delicate burner components, and the vast expanse of the cooktop. Each step has brought you closer to a truly pristine gas stove. But a masterpiece isn’t complete without its finishing touches. It’s often the small, seemingly insignificant details that elevate a good clean to an extraordinary one, and in the case of your gas stove, these details are the control knobs and the often-forgotten drip pans. These unsung heroes collect grease and food splatter, yet they’re frequently overlooked in daily cleaning routines.
Neglecting these areas means that despite your best efforts on the main surfaces, your stove won’t achieve its full potential of cleanliness and hygiene. Control knobs, in particular, are touched constantly, making them prime real estate for transferring grease and bacteria. Drip pans, if your stove has them, directly catch overflow and can become a sticky, charred mess. This final phase of your deep clean is about addressing these often-missed spots, ensuring that every inch of your gas stove is not just visually appealing but also hygienically sound. Get ready for that truly complete, satisfying sparkle that only a thorough deep clean can provide.
SEE NEXT PAGE
ADVERTISEMENT
