ADVERTISEMENT
Beyond the primary players, you’ll need a few common gardening implements. A sharp, clean knife or a small melon baller will be essential for hollowing out the potato. A spoon can also come in handy. For drainage, a small drill with a narrow bit or a sturdy skewer will be necessary. You’ll also want a small amount of sphagnum moss or fine bark chips, not as the primary medium, but for initial stabilization around the orchid’s roots if needed. Finally, a small saucer or tray to catch any excess moisture, and a spray bottle for misting will complete your essential toolkit. With these simple items in hand, you’re ready to move from preparation to the exciting phase of integration. What comes next is surprisingly intuitive, yet critically important for success.
The Step-by-Step Cultivation Process: Bringing Your Vision to Life
Now, the moment you’ve been waiting for: transforming your potato into a vibrant, living planter for your orchid. This process is straightforward, but each step is vital for ensuring the longevity and health of your botanical masterpiece. Follow these instructions precisely, and you’ll be well on your way to showcasing a truly unique display. Remember, patience and attention to detail are your greatest allies in this unconventional venture.
Preparing Your Potato Planter
The journey begins with the potato itself. Select your chosen large, firm, starchy potato. Wash it thoroughly under cool running water to remove any soil or debris from its skin. Do not peel the potato; the skin provides structural integrity and contains valuable nutrients. This seemingly minor detail is actually a major factor in the potato’s ability to sustain your orchid for longer periods. It’s like building a solid foundation before erecting a beautiful house.
Next, carefully hollow out a cavity in the potato. Using a sharp, clean knife or a melon baller, create a pocket large enough to comfortably accommodate the orchid’s root ball. Aim for a cavity that is deep enough to cradle the roots but leaves at least a half-inch of potato flesh around the sides and bottom for structural support and nutrient supply. Be gentle to avoid cracking the potato. The goal is a snug fit, not a cramped one, allowing the roots to eventually spread and intertwine with the decomposing potato material. This precision ensures your orchid has the optimal space to thrive.
ADVERTISEMENT
Crucially, effective drainage is paramount. Even though the potato provides moisture, stagnant water is the enemy of orchid roots. Using a small drill with a narrow bit (around 1/8 to 1/4 inch) or a sturdy skewer, create two to three drainage holes at the very bottom of the potato. These holes will allow excess water to escape, preventing root rot and ensuring adequate air circulation around the roots. This step is non-negotiable; skipping it will almost certainly lead to failure. Think of it as creating the ideal ventilation system for a delicate ecosystem within your spud. With your potato now prepped, the true artistry begins.
Orchid Integration
With your potato prepared, it’s time to introduce your chosen orchid to its new, unconventional home. Carefully remove the orchid from its original pot. Gently tease away as much of the old potting medium (bark, moss, etc.) as possible from the roots. Be extremely gentle during this process; orchid roots are delicate and prone to damage. If any roots are shriveled, papery, or discolored, trim them back with sterilized scissors, leaving only healthy, plump roots. This careful preparation minimizes transplant shock and gives your orchid the best possible start.
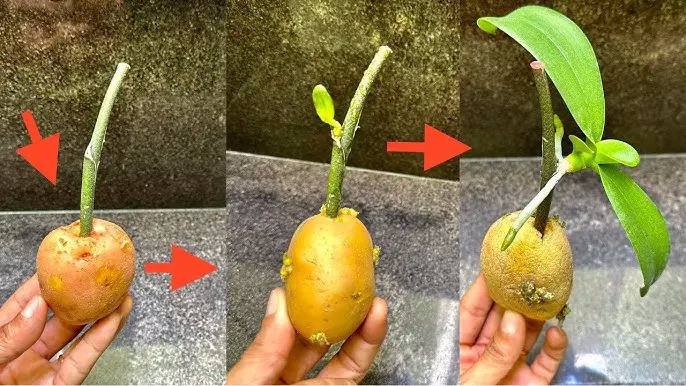
Now, carefully position the orchid’s root ball into the hollowed-out potato cavity. Ensure that the orchid sits securely and is relatively upright. The base of the orchid (where the roots meet the leaves) should be just at or slightly above the potato’s opening. If the fit is too loose, you can gently pack a small amount of fresh, moist sphagnum moss or fine orchid bark around the roots within the potato cavity to provide initial stability. This acts as a temporary anchor, giving the orchid time to acclimate and its roots to begin engaging with the potato’s internal structure. This delicate placement is key to the orchid’s early success.
Initial Care and Placement
Immediately after planting, give your potato-bound orchid its first watering. Water thoroughly but carefully, allowing excess water to drain out of the bottom holes. The potato will absorb a significant amount of this moisture, becoming saturated. Place the potato on a small saucer or tray to catch any runoff and protect your surfaces. Remember, while the potato offers a unique moisture retention system, regular monitoring of humidity and a balanced watering schedule are still essential. You’re initiating a delicate balance that will support flourishing growth.
SEE NEXT PAGE
ADVERTISEMENT
